Answered By: Jeff Beuck Last Updated: Apr 06, 2020 Views: 187549
Microsoft Word has an automatic table of contents function that can automatically generate a table of contents for your document, provided you correctly tag the chapter headers and sub-headers that you wish to show in your table of contents. Setting this up can be a time-consuming process, but if you are writing a lengthy document that will go through several drafts, the automatic Table of Contents can save you a lot of manual revising each time your page numbers or chapter titles change.
Step 1: In order for Word to identify the headers and subheaders for your Table of Contents, you need to apply the appropriate "Heading" styles to your chapter and sub-chapter headers.
For example, to mark a chapter title as a Level 1 Heading, first select the text that you would like to appear as the chapter heading in the Table of Contents by clicking-and-dragging your cursor over it to highlight it.

Next, on the "Home" tab on the menu, go to the Styles section and find the style "Heading 1" (but don't click it yet, because clicking it will reformat your title to Word's default "Heading 1" style format).

For your first chapter heading, right-click the style "Heading 1" and select "Update Heading 1 to Match Selection". This will both apply the "Heading 1" style to your chapter heading (allowing the Table of Contents to detect it), and also update the Heading 1 style for your document to match the style you were using.
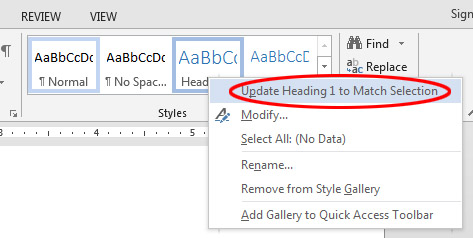
Once the "Heading 1" style has been updated to match that in your document, for the other chapter headers, just highlight the chapter title and left-click on the (now-modified) "Heading 1" style to apply it.
For sub-chapter titles, repeat this process, but use the "Heading 2" style instead. (You can also do this with "Heading 3" styles for sub-sub-headings, etc., if necessary.)

If you have a title or subtitle that is part of an existing paragraph, or if you would like the Table of Contents text to be different than what appears in the body of your text, you can insert a manual Table of Contents field instead of applying a Heading style to an entire paragraph. First, select the part of the paragraph you would like to use as the title of the chapter or subchapter (or place your cursor where the new chapter or subchapter begins).

Press "Alt-Shift-O" (letter O, not zero) to open a manual Table of Contents Entry box. In the "Entry" field, enter the text for this section as you would like it to be displayed in your Table of Contents. Next to "Level", select "1" for main chapter titles, "2" for subchapters, "3" for sub-subchapters, etc. Unless you have multiple Table of Contents in your document, leave the "Table identifier" as is.
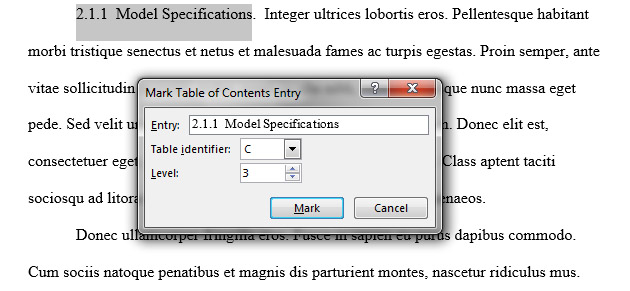
After you click "Mark", Word will automatically turn on showing of formatting symbols, and you should see a TC (Table of Contents) field code in brackets. This will not print as part of your document; Word only uses it to identify it as a Table of Contents marker. You can change the text to be displayed in the Table of Contents by editing the text within the quotation marks inside the brackets. You can also change the level of the heading by changing the number.

Step 2: Once you have all the chapter headings and sub-headings flagged with the correct Heading styles or Table of Contents field markers, you can generate your Table of Contents. Place your cursor at the top of the page where you would like to generate the Table of Contents and make sure the line where the cursor is placed is left-justified or full-justified (if it is center-justified, you will not be able to right-align page numbers properly). Next, go to the "References" tab on the menu, and select "Table of Contents". Below it you will see many different pre-defined Table of Contents styles. If you see one that matches what you need, select it. In most cases, you will probably need to create a customized Table of Contents by selecting "Custom Table of Contents".
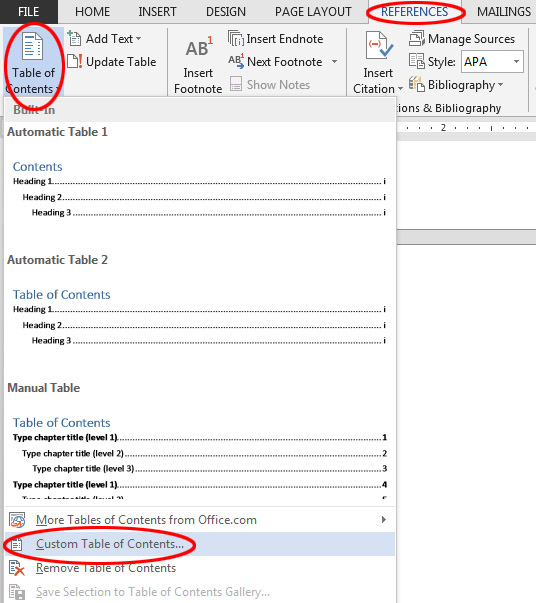
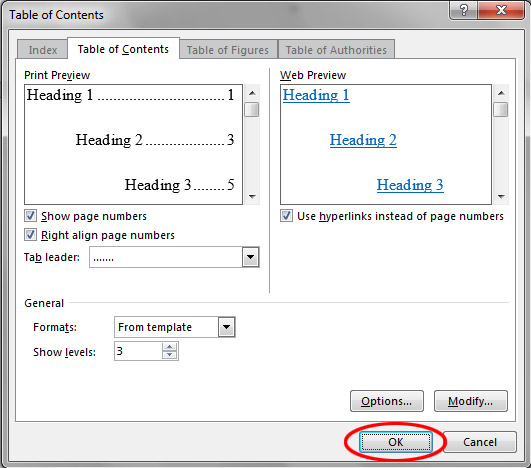
The Table of Contents settings window will open. If you are creating a Table of Contents for a thesis or dissertation, there are several settings you will need to change.
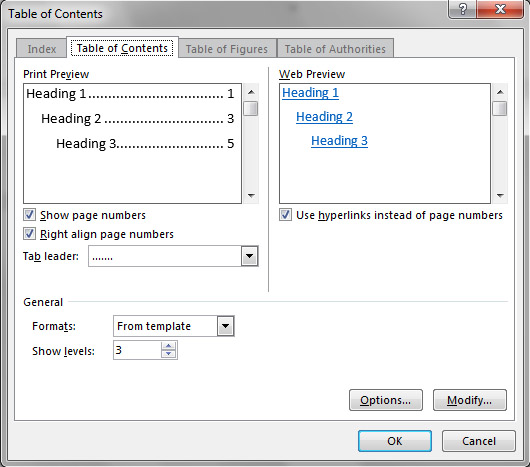
First, make sure "Show page numbers" and "Right align page numbers" are checked, and that the Tab leader is set to dots ("......") -- these settings will make sure you have dots between the chapter titles and page numbers, and that the page numbers are neatly aligned along the right margin. If you have more than 3 levels of subtitles in your document, you may also need to change "Show levels" to a higher number like 4.

If you used Table of Contents field codes in your document in addition to or instead of header styles, you will need to click "Options..." and make sure the box next to "Table entry fields" is checked. If you used styles other than "Heading 1", "Heading 2", and "Heading 3" to define your Table of Contents, you can also define those here. When finished, click "OK" to return to the Table of Contents window.

Next, click "Modify...". The Style window will open; this is where you can define the font and indents for each title level in the Table. Select a level (for example, "TOC 1" for the main Chapter headers) and click "Modify".

Change the font here to match the font in the rest of your document. If your Table of Contents needs to be double-spaced, be sure to also click the double-spacing button. The Sample Text window below these settings will give you a preview of what the text in this level will look like. Click "OK" to save the settings when done.

Repeat the style modification above for the other levels of your document. For the sublevels, you may also need to increase the ident for each level in addition to changing the font and line spacing.

When you are finished updating the levels, you should be ready to add your Table of Contents. Return to the main Table of Contents screen and click "OK".
Word will insert the Table of Contents at the point of your cursor. Check it carefully to make sure Word didn't miss any chapter titles or subtitles and that the page numbering looks correct; if there are problems, double-check that you tagged text with the correct header styles or Table of Contents codes (see Step 1 above). If there are problems with the formatting, click "Undo" to remove it, then generate a new Table of Contents by going back to References > Table of Contents > Custom Table of Contents" to correct it. You can also make manual edits and formatting changes directly in the Table (but be warned that if you have Word update the Table, these manual edits will be overwritten).

Word does not automatically update the Table of Contents as you type, but if you make changes to your document and need to update the Table, you can do this quickly by selecting/highlighting your Table of Contents, and then going to the "References" tab on the menu and clicking the "Update Table" button next to "Table of Contents".

If you just need to update the page numbers, select "Update page numbers only". If you have added new chapter headings or sub-chapter headings to your document, select "Update entire table". Note that if you select "Update entire table", any additional formatting or typing you changed manually after creating the automatic Table of Contents will be overwritten.

If you need additional assistance creating an automatic Table of Contents for your research paper, thesis, or dissertation, contact Jeff Beuck at 216-523-7486 to set up an appointment.
Was this helpful? 0 0
Comments (10)
-
Thanxxxxxxxxxxxxxx :)by Mohamed Gobrail on Jun 13, 2019
-
thank you very much because of this my report is beginning to make senceby Manatsa katsande on Oct 10, 2019
-
Thanks, Jeff. Found this on Google and it was a big help as it answered a question without way too much extra info.by Robert Christian on Feb 06, 2020
-
Thanks, found this on google is really useful and amazingby Yosephine on Apr 10, 2020
-
I had a report export from Microsoft SQL Server Report Server (SSRS) with these embedded field codes and couldn't figure out how to use them to get a table of contents. Thank you so much!!by Shannon on Nov 25, 2020
-
Thank you, very helpfulby Faith Mufutumari on Feb 12, 2021
-
Thanks a lot sirby Bast on Jul 02, 2021
-
This is still a Very helpful article. Just knowing how the TOC functions works helped out a lot.by John on Jul 06, 2022
-
Am so glad ,now i can edit all my documents swiftlyby Ian Chemunje on Oct 29, 2022
-
Thank you so much for this!! Very clear and exactly what I needed. You're about to be the MVP of my PhD dissertation formatting. I should include you in my acknowledgements.by Jac on Apr 12, 2023
